
This is the pumpkin pie recipe with evaporated milk that has been on the back of the can for generations, written out properly — with the temperatures, the timings, and the one thing nobody tells you: how to know when it is actually done.
Evaporated milk is not a shortcut or a substitute here. It is the reason a classic pumpkin pie sets into a smooth, sliceable custard instead of a watery, weeping one. Five minutes of whisking, one bowl, and an hour in the oven.
What makes evaporated milk the right choice?
Evaporated milk is regular milk with about 60% of its water removed. That single fact explains everything.
A pumpkin pie is a custard. Custards set when eggs coagulate and trap the liquid around them — and the more water in that liquid, the looser and more fragile the set. Swap in regular milk and you are adding back all the water evaporated milk had removed. The pie still bakes, but it sets softer, weeps liquid as it cools, and slices messily.
Evaporated milk also concentrates the milk sugars, which brown gently in the oven and give the filling a faint caramel note you do not get from cream. It is richer than milk, thinner than cream, and shelf-stable — which is exactly why it became the standard.
The most common mistake is confusing evaporated milk with sweetened condensed milk. They sit side by side in identical-looking cans and they are not interchangeable. Condensed milk is loaded with sugar. Use it in this recipe and you will get a sickly, over-sweet pie, because you have already added the sugar separately. Check the can says evaporated.
The second mistake is overbaking. Almost every cracked pumpkin pie is an overbaked one, and the section below fixes that for good.
Key ingredients and why they matter
| Key Ingredient | What To Use | Why It Matters |
|---|---|---|
| Evaporated milk | One 12 oz can, not sweetened condensed | Less water means a firmer, smoother set and no weeping. This is the whole recipe. |
| Pumpkin puree | One 15 oz can of 100% pumpkin | Make sure it isn’t “pumpkin pie filling,” which is pre-sweetened and pre-spiced. |
| Eggs | 2 large, room temperature | The setting agent. Cold eggs don’t disperse evenly and can leave streaks. |
| Sugar | 3/4 cup granulated | Sweetens and softens the custard. Brown sugar works too and adds molasses depth. |
| Salt | 1/2 teaspoon — don’t skip it | Without salt the spices taste flat and the pie tastes oddly of nothing. |
| Warm spices | Cinnamon, ginger, cloves, nutmeg | Ground fresh if you can. Pre-mixed pumpkin pie spice is fine — use 2 teaspoons. |
How to make it
- Whisk the filling. Eggs first, then pumpkin, then sugar, salt and spices, then the evaporated milk last.
- Start hot. 425°F for 15 minutes to set the crust edge.
- Drop the heat. 350°F for another 40–50 minutes, until the centre still wobbles slightly.
- Cool completely. The pie finishes setting on the counter, not in the oven. This part is not optional.
Pumpkin Pie with Evaporated Milk
The classic evaporated milk pumpkin pie — one bowl, smooth custard filling, and a foolproof doneness test.
Ingredients
- 1 unbaked 9-inch pie crust, homemade or store-bought
- 1 can (15 oz) 100% pumpkin puree
- 1 can (12 oz) evaporated milk
- 2 large eggs, room temperature
- 3/4 cup granulated sugar
- 1/2 teaspoon salt
- 1 teaspoon ground cinnamon
- 1/2 teaspoon ground ginger
- 1/4 teaspoon ground cloves
- 1/4 teaspoon ground nutmeg
- Whipped cream, to serve
Instructions
- Heat the oven to 425°F (220°C) and set a rack in the lower third. Fit the pie crust into a 9-inch pie plate and crimp the edge. Chill it while you mix the filling.
- Beat the eggs lightly in a large bowl. Whisk in the pumpkin puree until completely smooth.
- Whisk in the sugar, salt, cinnamon, ginger, cloves and nutmeg until no streaks remain.
- Gradually whisk in the evaporated milk. Add it last and pour slowly — dumping it in at once makes the filling harder to smooth out.
- Pour the filling into the chilled crust. It will come close to the rim; that’s normal. For less mess, set the pie plate on the oven rack first and pour there.
- Bake at 425°F for 15 minutes. This sets the crust before the wet filling can soak into it.
- Without opening the oven, reduce the heat to 350°F (175°C) and bake a further 40–50 minutes, until the outer 2 inches look set and the centre still wobbles slightly when you nudge the pan.
- Cool on a wire rack for at least 2 hours. The centre finishes setting as it cools — do not slice it warm.
- Refrigerate for at least 2 more hours before serving, then top with whipped cream.
How to tell when pumpkin pie is done
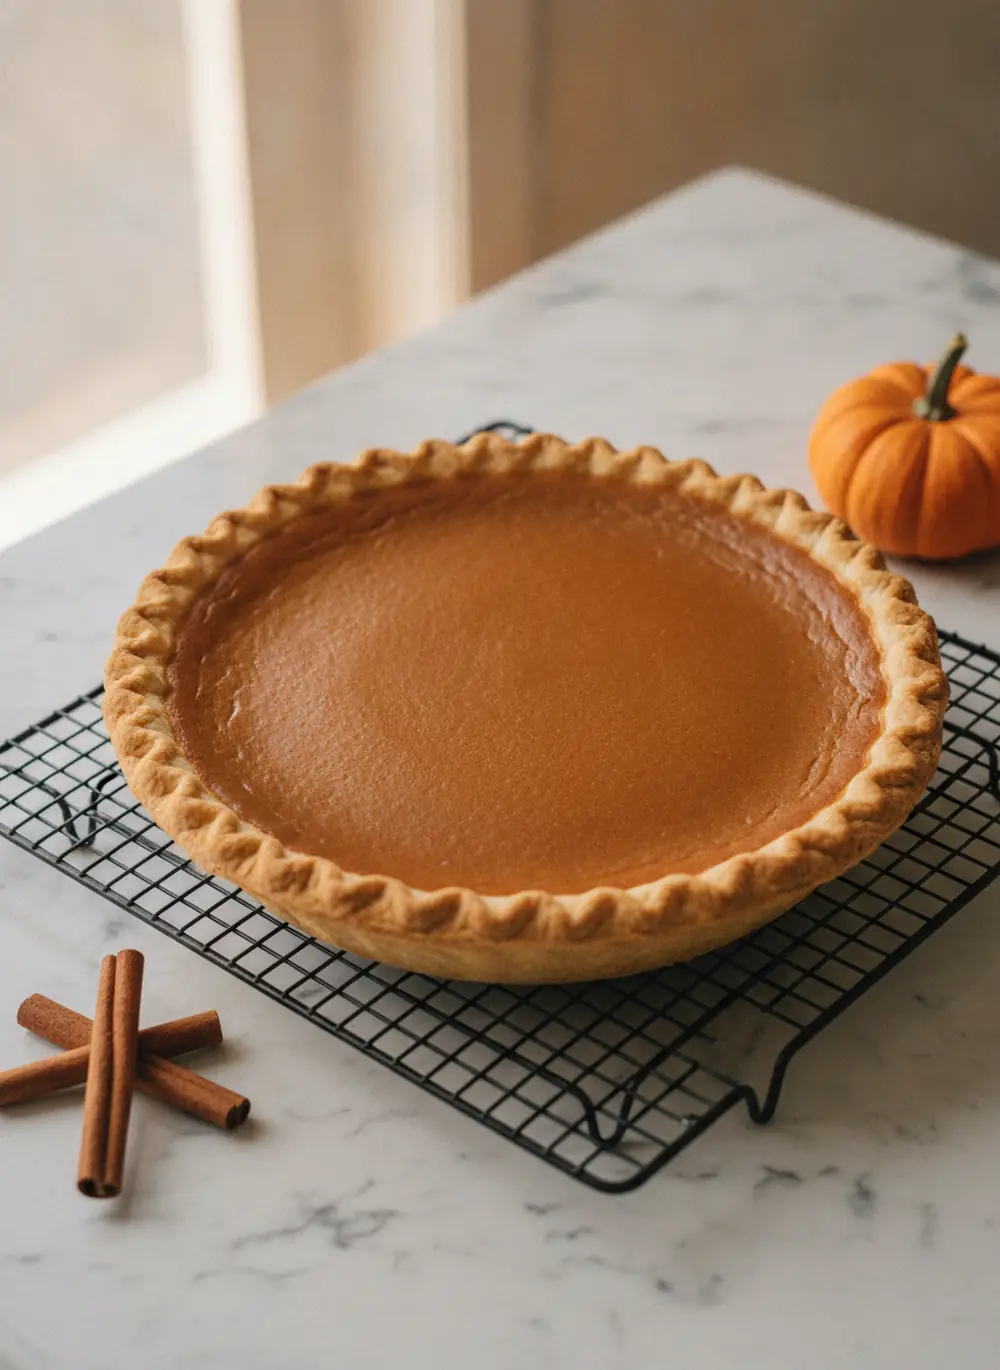
This is where most pumpkin pies are lost, so it’s worth being precise. A pumpkin pie is a custard, and custards keep cooking after they leave the oven. If it looks perfectly set in the oven, it is already overbaked.
Use these three checks together:
| Test | What Done Looks Like | What Overbaked Looks Like |
|---|---|---|
| The wobble | Outer 2 inches set and puffed; a 2–3 inch circle in the centre jiggles as one piece, like set jelly | No movement at all, or the surface has domed and cracked |
| Temperature (most reliable) | 175–180°F in the centre on an instant-read thermometer | Above 185°F — the eggs have curdled and will weep water |
| The surface | Matte and dry-looking, no wet shine in the middle | Deep cracks radiating from the centre |
Ignore the old advice to push a knife into the middle. It tells you very little and it opens a slit that becomes a crack as the pie cools. If you want to test with something, use a thermometer — the same one you’d use for a roast.
How long to bake pumpkin pie
| Pie Size | At 425°F | Then At 350°F | Total |
|---|---|---|---|
| 9-inch standard | 15 min | 40–50 min | ~55–65 min |
| 9-inch deep dish | 15 min | 50–60 min | ~65–75 min |
| 10-inch | 15 min | 45–55 min | ~60–70 min |
| Mini pies / muffin tin | — | 350°F, 20–25 min | ~20–25 min |
Do you have to chill pumpkin pie?
Yes — for two separate reasons.
Texture: the custard is not finished setting when it leaves the oven. It firms up as it cools, first on the counter and then in the fridge. Slice it warm and you get a soft, slumping wedge instead of a clean one.
Food safety: pumpkin pie is an egg-and-dairy custard, so it should not sit at room temperature indefinitely. Cool it on the counter for up to 2 hours, then refrigerate. The USDA advises refrigerating egg-based custard pies within 2 hours of baking and keeping them chilled. Serve it cold or at cool room temperature — take it out 20 minutes before serving if you prefer it less fridge-cold.
Variations and customizations
- Brown sugar version. Swap the granulated sugar for packed light brown sugar for a deeper, more caramel flavour.
- Maple. Replace 1/4 cup of the sugar with real maple syrup.
- Extra rich. Use one whole egg plus two yolks instead of two whole eggs for a silkier custard.
- Bourbon. A tablespoon whisked into the filling is a classic Thanksgiving addition.
- Crustless. Butter the pie plate well and pour the filling straight in — bake at 350°F for about 45 minutes.
- Mini pies. Line a muffin tin with crust rounds, fill, and bake at 350°F for 20–25 minutes.
Common problems and how to fix them
| Problem | Likely Cause | Easy Fix |
|---|---|---|
| Big crack across the middle | Overbaked — the classic cause | Pull it while the centre still wobbles. Cover any crack with whipped cream and nobody will know. |
| Watery layer under the filling | Eggs curdled from too much heat | Keep the oven at 350°F after the first 15 minutes and check the temperature at 40 minutes. |
| Soggy bottom crust | Crust never set before the filling soaked in | Don’t skip the 425°F start, and bake on a rack in the lower third of the oven. |
| Filling never set | Underbaked, or regular milk used instead of evaporated | Check the can. If underbaked, return it to a 350°F oven for 10-minute stretches. |
| Burnt crust edge | Exposed pastry cooks faster than the filling | Cover the rim with foil strips or a pie shield after the first 25 minutes. |
| Sickly sweet | Sweetened condensed milk used by mistake | The cans look alike. Buy evaporated milk — unsweetened. |
Tips for the best results
- Room-temperature eggs. They blend smoothly into the pumpkin instead of leaving streaks.
- Fill the pie in the oven. Set the crust on the pulled-out rack and pour there — no spills carrying a brimming pie across the kitchen.
- Lower third of the oven. More bottom heat sets the crust faster and helps prevent a soggy base.
- Make it a day ahead. Pumpkin pie is genuinely better on day two, once the custard has fully firmed and the spices have settled.
Storage
Cover loosely and refrigerate for up to 4 days. Keep it chilled rather than on the counter — it’s a custard pie.
To freeze, cool completely, wrap tightly in plastic then foil, and freeze for up to 1 month. Thaw overnight in the fridge. The texture softens very slightly but it’s still good. Don’t freeze it with whipped cream on top — add that after thawing.
For another make-ahead autumn dessert that improves overnight, try our caramel carrot cake — same spice cupboard, same one-pan ease.
Short on time, or feeding someone gluten-free? Our crustless pumpkin pie is the same spiced custard with no pastry to make — one bowl, ten minutes of work, and about a third fewer calories a slice.
Prefer to start from a can? Our pumpkin pie from sugar pumpkins walks through roasting and draining a real pumpkin instead, for a deeper, less one-note flavor.
Frequently Asked Questions
How do you know when a pumpkin pie is ready?
The outer 2 inches should look set and slightly puffed, while a 2–3 inch circle in the centre still wobbles as one piece when you nudge the pan. The most reliable check is an instant-read thermometer: 175–180°F in the centre. If the whole pie is firm in the oven, it’s already overbaked.
Can I use regular milk instead of evaporated milk?
You can, but the pie will set softer and may weep liquid, because regular milk contains far more water. If it’s all you have, use whole milk and expect a looser slice. Heavy cream or half-and-half are much closer substitutes.
What’s the difference between evaporated and sweetened condensed milk?
Evaporated milk is unsweetened milk with most of the water removed. Sweetened condensed milk is the same thing with a large amount of sugar added. They are not interchangeable — condensed milk in this recipe makes an overwhelmingly sweet pie, since you’ve already added sugar separately.
Do you chill pumpkin pie before serving?
Yes. Cool it on the counter for up to 2 hours so the custard finishes setting, then refrigerate for at least 2 hours before slicing. As an egg custard, it should be kept refrigerated rather than left out — the USDA recommends chilling custard pies within 2 hours of baking.
Why did my pumpkin pie crack?
Almost always overbaking. The custard keeps cooking after it leaves the oven, so a pie baked until firm ends up past done and cracks as it cools. Pull it while the centre still jiggles. A crack is cosmetic only — the pie still tastes fine, and whipped cream hides it completely.
Can I make pumpkin pie ahead of time?
Yes, and it’s genuinely better for it. Bake it up to two days ahead, cool, cover loosely and refrigerate. The custard firms up and the spices settle overnight. Add whipped cream just before serving.
The pie worth making properly
A pumpkin pie made with evaporated milk sets into a smooth, sliceable custard with a clean edge and a faint caramel warmth — the version people actually remember. Pull it while the centre still wobbles, let it cool all the way, and it will be the easiest good thing on the table.